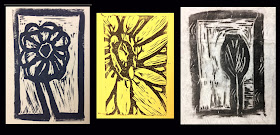
While exploring printmaking in college, I can't even begin to count the number of times slipped and cut myself with a linoleum cutter. And for this project, I was putting that exact same tool that I had encountered difficulty with at the age of 20, into my third graders nine year old hands.... I just kept thinking to myself....
"Are you CRAZY Ms. Foy?!?"
Needless to say, I had to really think this whole process out....
 So we started with simple instructions clearly posted on the board. I spent a shortened class we had due to an assembly actually going through this entire process step by step prior to beginning the project with them. This really helped my students understand not only the process they were about to explore, but the safety measures with this project.
 As students began to prepare for cutting into their EZ-Cut (a softer version of linoleum), they again had to go back through safety instructions with me and sign a paper acknowledging that if at any time they are not demonstrating these precautions, they will stop their project. Overall there were three basic guidelines...
- I will stay seated at all times and never point the cutter towards another student.
- I will always keep my hands behind the blade, and always cut away from myself.
- If at any time I am not cutting or need to move from my seat, the blade will be safely resting on the table.
Once finished cutting, students took turns rotating through three inking and printing stations. Two students showed an amazing natural eye for the inking and printing process and quickly became my assistants. Those two students took on leadership and taught and supervised every other student in inking and printing their piece. I think one of the things which simply amazed me, was one of these students hardly spoke English, and yet she so quickly grasped and became a leader with only watching, and my English instruction!
My inking stations were made simply by taping down two overhead transparencies onto the table. Students used a rolling pin or extra brayer to push down for even pressure when printing. We also made a list of all students, so that everyone had a chance to print. As students were called up to print, the remainder of the class completed a reflection page.
Students did an amazing job on this project and in regards to my safety concerns... we had ZERO injuries. I have learned so much about my students within this project, even those who I truly told myself that I was out of my mind for putting a sharp object into their small hands amazed me with their maturity and mastery of this process.
 A few of our printmakers even had their prints displayed at the Azerbaijan National Flower Day festival! Check out that post HERE!
* This process turned out to take roughly 3 class periods and required additional help and participation by two amazing classroom teachers.


No comments:
Post a Comment